Gateway Backup, Restore and Redeployment
The RTGS.global gateways maintain state about relationships on the network. This must be restored in the event of a redeployment, upgrade, or disaster recovery scenario.
Note: When deploying a new gateway instance, enable the Maintenance Mode option during installation. This allows you to work on the gateway without it processing live traffic.
Creating a Backup
Prerequisites
- Azure CLI installed
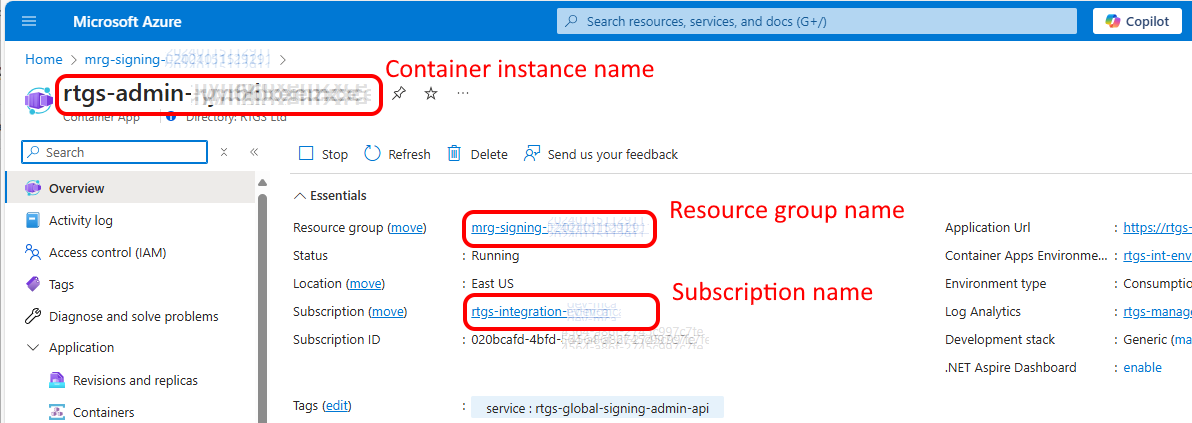
- The name, resource group, and subscription of your
rtgs-admin-***container instance (inside the RTGS.global Signing deployment) - Appropriate access to execute remote commands
Running the Backup
With the rtgs-admin-*** container selected in the Azure Portal, here is where to find the required names:
Execute the following command:
az containerapp exec \
  --name <rtgs-admin-container-name> \
  --resource-group <resource-group-name> \
  --subscription <subscription-name> \
  --command "bash ./scripts/backup-agent-data.sh"
This creates a backup of the local databases. Depending on the age and number of your relationships, this may take a few minutes.
Note: For security reasons, backup files can only be written to the local storage account.
Three files are written to Blob storage within the storage account associated with your RTGS.global Signing deployment:
wallet-backup.sqlrtgs-connections.jsonpartner-connections.json
Downloading Backup Files
Note: Because RTGS.global marketplace deployments use private networking, you may need to use a jump box, bastion, or similar private route to connect to the storage account.
-
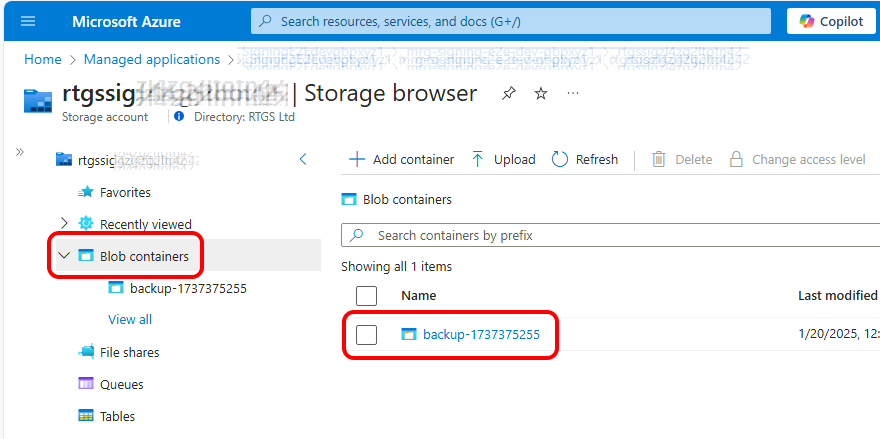
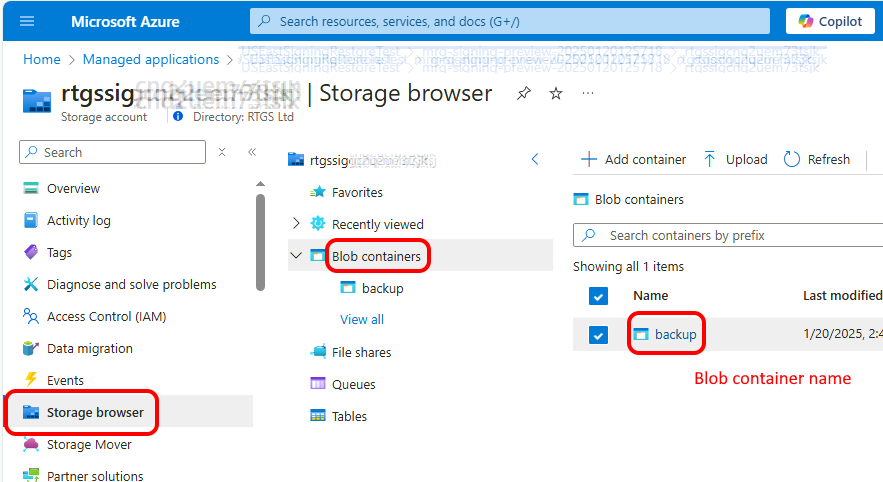
Navigate to the storage account in your deployment (name begins with
rtgssig). -
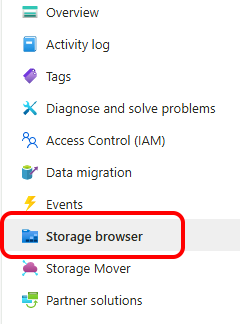
Choose Storage browser from the menu.
-
Choose Blob containers. Each backup has a date-stamped folder.
-
Click the ellipsis next to each file and choose Download.

To download via Azure CLI:
az storage blob download \
  --account-name <rtgssig-storage-account-name> \
  --container-name <timestamped-backup-folder-name> \
  --name <remote-file-name> \
  --file <local-file-name> \
  --auth-mode login
Restoring a Backup
Note: For security reasons, backup files can only be read from the local storage account.
Step 1 — Upload the Backup Files
If restoring to the same instance that created the backup, skip this step — the files are already present.
-
Navigate to the storage account (name begins with
rtgssig). -
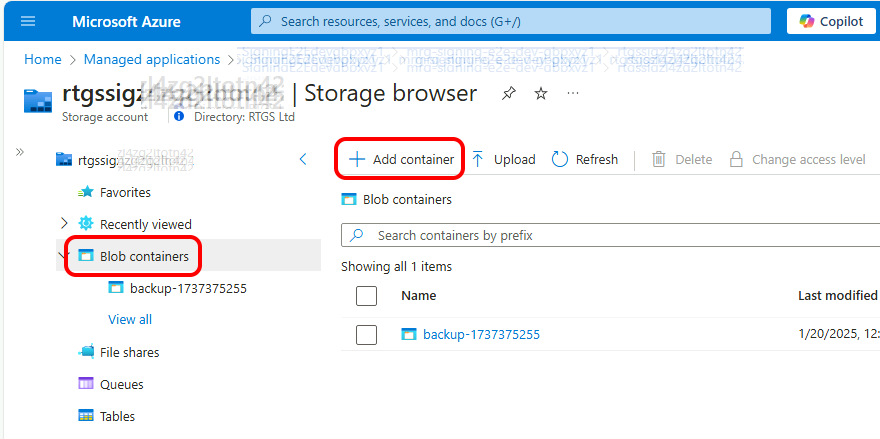
Choose Storage browser, then Blob containers.
-
Click Add container, give it a name, and click Create.
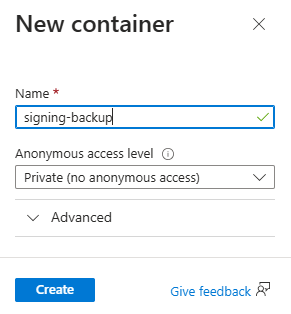
-
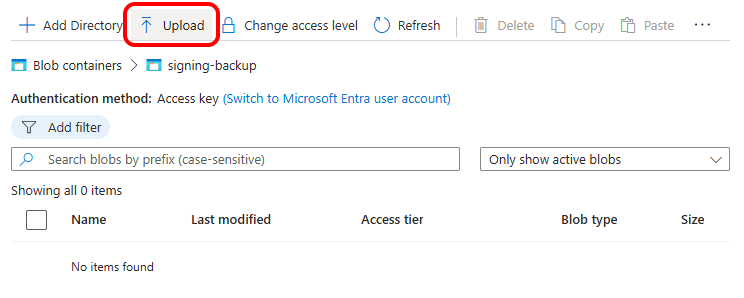
Click Upload and select the backup files.
To upload via Azure CLI:
az storage blob upload \
  --account-name <rtgssig-storage-account-name> \
  --container-name <new-container-name> \
  --name <remote-file-name> \
  --file <local-file-name> \
  --auth-mode login
Step 2 — Trigger the Restore
You will need:
- Azure CLI installed
- The
rtgs-admin-***container name, resource group, and subscription - The name of the Blob container holding the backup files
With the rtgs-admin-*** container selected in the Azure Portal, here is where to find the required names:
With the rtgssig storage account selected in the Azure Portal, here is where to find the Blob container name:
az containerapp exec \
  --name <rtgs-admin-container-name> \
  --resource-group <resource-group-name> \
  --subscription <subscription-name> \
  --command "bash ./scripts/restore-agent-data.sh <blob-container-name>"
This restores local databases from the backup files. Depending on the age and number of your relationships, this may take 30 minutes or more.
Important: After a restore, you must restart the
rtgs-admin-***andrtgs-didcomm-***containers inside the RTGS.global Signing deployment. These containers maintain internal caches that must be cleared.